


How to setup your hosted pages
A step-by-step guide to plans and checkout
- Go to your account on admin.billwerk.plus
- Choose configurations – and other configurations
- Get started by adding ‘hosted pages products’
- When ready with your products – go to configurations and choose ‘hosted pages’
- In hosted pages, click ‘create new’ and add your information
- Choose your products for your hosted pages and push submit
- To view your plans and check out – click to open your new hosted pages
- Add the URL to your website, emails or direct link from your Social Media accounts
You are currently viewing a placeholder content from Vimeo. To access the actual content, click the button below. Please note that doing so will share data with third-party providers.
More InformationThe self-service portal
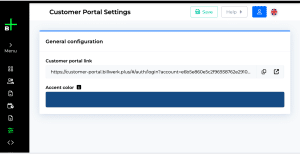
- Go to your account on admin.billwerk.plus
- Go to configurations
- Choose customer portal settings
- Change the color of the page
- Open or copy the URL to view the Customer Self-service portal.
What you get
1

Visual plan hosted by Billwerk+
Add your predefined plans as products in the admin. Control the display of your plans and add icons, descriptions, and badges to visualize the most attractive one. In the admin, you can define your plans, and control the trial period, name, duration, frequency, and fee.
2

Checkout flow and process
Activate your plans by adding your pages to your website, email, social media posts, etc. Included in the pages are your logo, company name, and address for the safety of your customers.
3

Portal for customer self-service
Add the self-service URL to your page, customer email, or direct link in your chat. Your customer can easily log in with a unique code sent by email from the system and by that have access to change and edit details on their settings.
How to get started
- Create a test account at Billwerk ->
- Setup your plans, and details for your company
- Configure your hosted pages
- Activate your pages by adding URLs
- Activate your account